
🔍 OCR Text Recognition
Quickly recognize the text in an image and copy it to the clipboard.
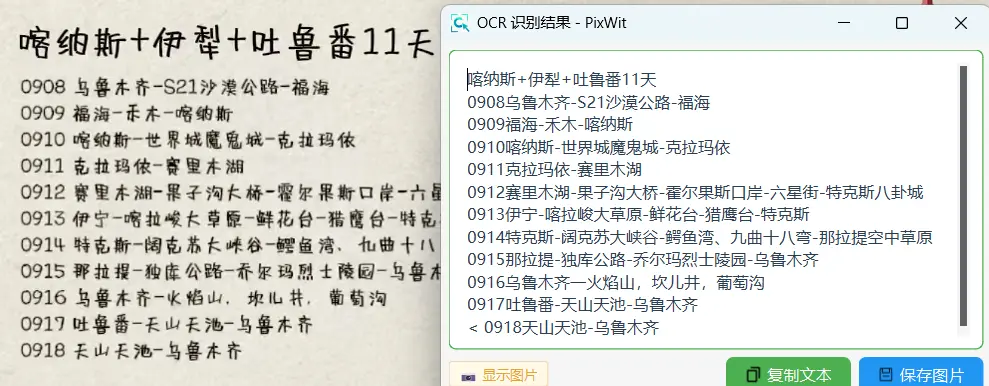
Entry points and triggers
| Entry point | Description |
|---|---|
| Hotkey Ctrl+O | Can be changed in Settings → Hotkey Settings → 🤖 AI Feature Hotkeys → 📝 Text Recognition (OCR); clear it to disable |
| "Text Recognition" on the toolbar | Button on the toolbar of the screenshot editor window |
| "OCR Recognition" in the image viewer | Runs text recognition on the currently open image; while running, the button changes to "Recognizing..." |
Behavior when triggered:
- Editor window already open: text recognition runs directly on the current image.
- No editor window: you first enter region selection, and recognition runs immediately after you select the region, without jumping to the editor window first. So Ctrl+O itself is the quick "screenshot → OCR directly" workflow.
- If an annotation tool is also selected in the region selection, the AI action is not performed.
Service priority
The three checkboxes in Settings → 🤖 AI Service Config → AI Service Source can be multi-selected, and the priority is fixed:
| Priority | Service | Description | Default |
|---|---|---|---|
| 1 | Local OCR only (offline recognition, no internet needed) | When checked, text recognition uses local OCR only (highest priority) | On |
| 2 | Custom AI / Baidu OCR | Use your own API Key and configure your own large language models and specific services | Off |
| 3 | Pixwit AI | Cloud AI service, full features, no configuration needed | On |
Service priority does not mean "PixWit AI first"
As long as "Local OCR only" is checked, text recognition goes to local OCR first rather than the cloud. If none of the three is enabled, you will see the toast "OCR Unavailable / Please check 'Local OCR only' or enable a cloud AI service".
OCR results window
The OCR results window has no button bar; all actions are in the context menu:
| Menu item | Description |
|---|---|
| 📋 Copy Selected / 📄 Copy All | Copy the selected text / all text |
| 📋 Copy all text | Copy plain text |
| 💾 Save image | Save the current image |
| 📝 Switch to Plain Text (editable) / 🌐 Switch to HTML (keep formatting) | Switch the text view |
| 📌 Keep window on top | Toggle always-on-top (by default follows "OCR Result Window Always on Top" in Settings) |
| 📐 Format | Trim line whitespace / Remove extra blank lines / Merge into paragraphs / Break lines at punctuation / Fix Chinese punctuation / Remove spaces |
| ↺ Reset Layout | Restore the default layout |
| ✕ Hide Image / 📷 Show Image, ≡ Hide Text Panel / ☰ Show Text Panel | Right-click in the image area to collapse the left or right pane |
Window hotkeys:
| Hotkey | Function |
|---|---|
| Ctrl+C | Copy (the window then closes automatically) |
| Ctrl+T | Toggle always-on-top |
| Esc | Close the window |
📷 Image placeholder (Figure 1)
OCR results window context menu — shows the expanded context menu of the results window: copy selected/copy all, the Format sub-items, keep window on top, reset layout, hide image/hide text panel To add: put the image at docs/public/images/ocr-result-menu.webp, then delete this tip block and uncomment the next line
Click-to-copy
- Simply click a line of text in the image and that line is copied to the clipboard, with a green highlight box appearing around it and
✅ Copied. - The first time the window opens, it shows a hint once: "💡 Click any line on the image to copy that line".
📷 Image placeholder (Figure 2)
Click-to-copy highlight — shows the green highlight box and the ✅ Copied hint after clicking a line of text in the image To add: put the image at docs/public/images/ocr-click-to-copy.webp, then delete this tip block and uncomment the next line
Recognition complete and recognition in progress
- When recognition completes, the entire result is written to the clipboard automatically, with the toast
✓ Copied N lines to clipboard. - During recognition, a progress overlay (
Recognizing...) appears in place on screen; press Esc or click the overlay to cancel. - If you trigger it again before the previous round has finished, you will see the toast "OCR in Progress".
Local OCR models
Settings → AI Service Config → Local OCR model provides a model variant dropdown, a Download small button, and a status row showing whether tiny / small is installed and in effect.
| Option | Description |
|---|---|
| Auto (Recommended) | Uses small if it has been downloaded, otherwise the built-in tiny (default) |
| tiny (Built-in, fast) | Bundled with the installer, about 6MB |
| small (High accuracy) | About 31MB; click "Download small" to download it once, then it can be used offline |
- Switching the model takes effect only after restarting the program.
- If no model is available yet on first use of local OCR, you will be prompted to download the "OCR model (about 31MB)".
📷 Image placeholder (Figure 3)
Local OCR model settings — shows the model variant dropdown (Auto / tiny / small), the Download small button and the tiny/small installation status row on the AI Service Config page To add: put the image at docs/public/images/ocr-local-model.webp, then delete this tip block and uncomment the next line
OCR settings
Settings → AI Service Config → OCR Settings:
| Setting | Description | Default |
|---|---|---|
| No window, auto-copy to clipboard | OCR triggered from the screenshot editor window and the image viewer no longer opens the results window and copies silently instead | Unchecked |
| Don't show the "OCR complete" tray notification | When a silent copy finishes, no system notification pops up in the bottom-right corner (failure notifications still appear); requires the previous option to be checked first | Unchecked |
| OCR Result Window Always on Top | Newly opened OCR results windows are automatically kept on top | Checked |
"No window, auto-copy to clipboard" only affects the path triggered from the editor window / image viewer; the OCR path triggered directly by the hotkey is not affected by this option. When a silent copy finishes, an
OCR completesystem notification pops up in the bottom-right corner by default; if you don't want it, check 'Don't show the "OCR complete" tray notification'.
Current OCR channel
At the bottom of the AI Service Config page, the current OCR channel is displayed in real time, for example Local OCR (Model: tiny), Custom AI / Baidu OCR, Pixwit AI Cloud Service, so you can confirm which service this recognition actually went through.
LaTeX formula recognition
- Entry: hotkey Ctrl+M, toolbar "Extract LaTeX Formula".
- Only supported by PixWit AI; when it is not enabled, you will see the toast "LaTeX formula recognition requires the PixWit AI service".
- Recognition is done by a multimodal vision model, and the prompt asks it to output LaTeX source only (no Markdown fences, no
$delimiters), with one formula per line; when there is no formula, you will see the toast "Failed to recognize formula". - Results are displayed in the same OCR results window, with the title
LaTeX Formula Extraction; copying works the same way as for OCR (when recognition completes, the result is also written to the clipboard automatically).
QR code / barcode recognition
- Entry: toolbar "Scan QR Code / Barcode" (there is no configurable hotkey).
- Recognition is instant and shows no progress overlay. When nothing is recognized, you will see the toast "No QR code or barcode detected."
- When content is recognized: it is shown in the OCR results window (multiple results are numbered
[1],[2]) → the first one is copied to the clipboard automatically → the screenshot editor window is closed.
Service capability comparison
| Feature | Local OCR only | PixWit AI | Custom service |
|---|---|---|---|
| Text recognition | ✅ | ✅ | ✅ (Baidu OCR, or the multimodal capability of a custom LLM) |
| Translation | Only as a recognition step | ✅ | ✅ (requires a configured custom LLM service) |
| Table extraction | ❌ | ✅ | ✅ (Baidu table recognition preferred) |
| LaTeX formula | ❌ | ✅ (the only one that supports it) | ❌ |
| AI Analysis | Only as a recognition step | ✅ | ✅ (requires a configured custom LLM service) |
| AI Chat | ❌ | ✅ | Requires a "multimodal model" |
FAQ
Q: OCR recognition is inaccurate / the model won't download?
- Local OCR needs a model on first use; you can go to Settings → AI Service Config → Local OCR model and switch between
tiny(built-in, fast) andsmall(more accurate), or download thesmallmodel. After switching the model, restart the program for it to take effect. - You can also switch to PixWit AI or the Baidu OCR cloud service.
Q: It reports "OCR Unavailable" during recognition?
- Go to Settings → 🤖 AI Service Config → AI Service Source and check "Local OCR only", or enable a cloud AI service (Custom AI / Baidu OCR, Pixwit AI).
Where to find AI Service Config
AI Service Config is in Settings (right-click the tray icon → Settings... → 🤖 AI Service Config in the left navigation). Some older toast text in the app still guides users to the "system tray menu" to find AI Service Config; that is outdated — go by Settings instead.
Related tutorials
- Image Translation
- Table Extraction
- AI Analysis (Chinese)
- AI Chat (Chinese)