PixWit
From pixels to infinite possibilities
No sign-up — unlimited visual insight
Screenshots, screen recording, editing, OCR, image translation, table extraction, image insights, word lookup…
✨ Key Features
Screenshot annotation, sticky notes, screen recording, OCR, translation, table extraction and video post-production — one tool covers it all
📸 Capture & annotate
Multi-monitor capture
Press F1 on whichever screen you want, with cross-screen selection and high-DPI scaling support.
UI element detection
Frames windows or the controls inside them; press Tab to switch modes and scroll to step through overlapping levels.
Full annotation suite
Arrow, pen, rectangle, ellipse, line, polyline, text, numbering, mosaic and spotlight — reorder the buttons freely.
Scrolling screenshot
Stitch long pages automatically or by hand; scrolling pauses when the cursor leaves the region, and the result becomes a sticky note.
📌 Sticky notes & productivity
Sticky notes & clipboard
Pin any image on screen as a reference: double-click to copy, Ctrl+wheel for opacity, Ctrl+Shift+V to paste clipboard content as a sticky.
Color picker & watermark
8x magnifier with RGB / #HEX / HEX output; watermarks with custom text, size, position and date-time.
History & search
Screenshots are kept automatically and grouped by date; star them, search the text inside them, and change the save folder or retention policy.
Remappable hotkeys
All 16 global hotkeys can be remapped or disabled, and the tray warns you when a combination is already taken.
🎥 Screen recording
Region / full-screen recording
A 3-second countdown, pause and resume at any time, MP4 / MKV / GIF output, stoppable from the tray or the floating control bar.
Annotate while recording
The cursor passes straight through until you pick a tool; then Alt+I / J / O / K draws lines, arrows, ellipses and rectangles.
Camera picture-in-picture
Pin the camera feed to the bottom-right corner during full-screen recording and drag it wherever you want it in the final video.
System audio + microphone
Record both at once with independent volume, or just one of them, or stay silent.
🤖 AI capabilities
OCR text recognition
Pick a local offline model or a cloud service; results are copied automatically, and clicking any line on the image copies that line.
Image translation
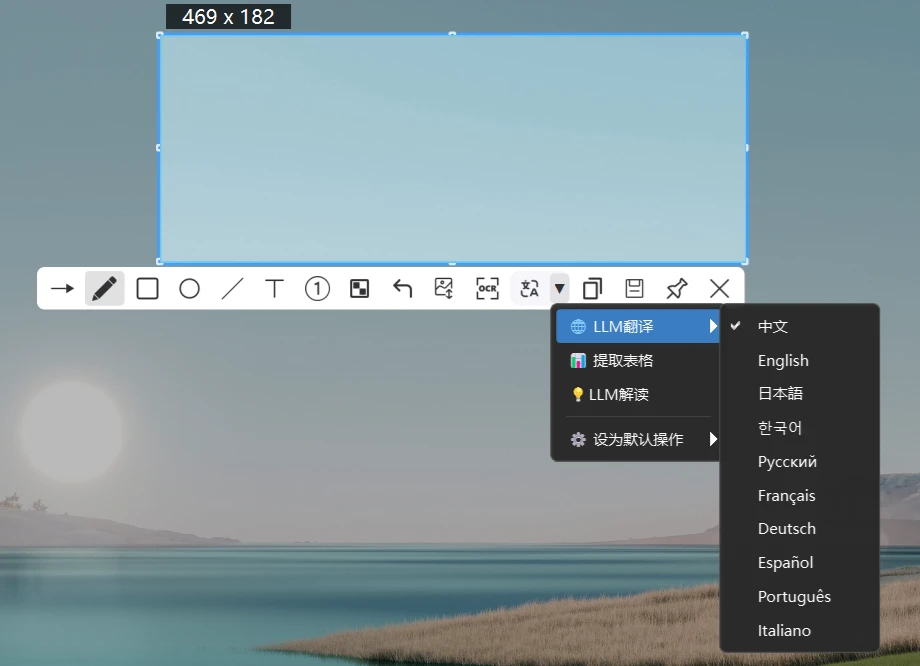
10 target languages and three translation styles; image translation renders the translation back onto the picture and saves them together.
Table extraction
Results are written to the clipboard automatically — paste into Excel with rows, columns and merged cells intact.
AI insights & chat
Text is recognized first, then a language model writes the summary, key points and suggestions — or you can chat with it across turns.
LaTeX formulas & QR codes
Extract formula source with a multimodal model, one formula per line; QR codes and barcodes are recognized and the first result copied.
🖼️ Images & video
Image viewer
Beyond zoom and pan: crop, rotate, perspective correction, resize and compress, annotate, convert formats and print.
Video editor
Trim, delete middle segments, compress, change speed, convert formats, dub and split audio — all in one window.
GIF editor
Crop, change speed and resize, plus frame-by-frame editing, drag-to-reorder and duplicate-frame detection.
🖼️ In pictures
Every screenshot below is the real PixWit interface — open the tutorial for the full details
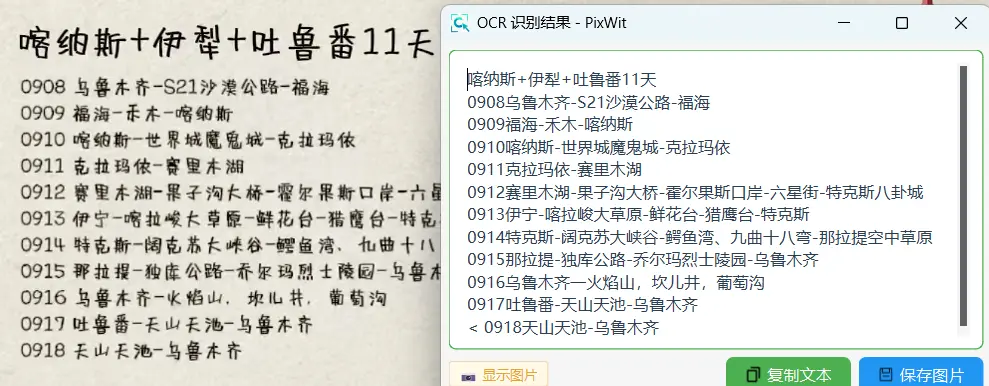
Capture and recognize in one step
Press Ctrl+O and the screenshot is recognized straight away, without opening the editor first.
- A tiny model ships with the app; download the higher-accuracy small model once and it works offline
- You can also use PixWit AI or your own Baidu OCR credentials
- The whole result is copied to the clipboard automatically, with a "✓ Copied N lines" toast
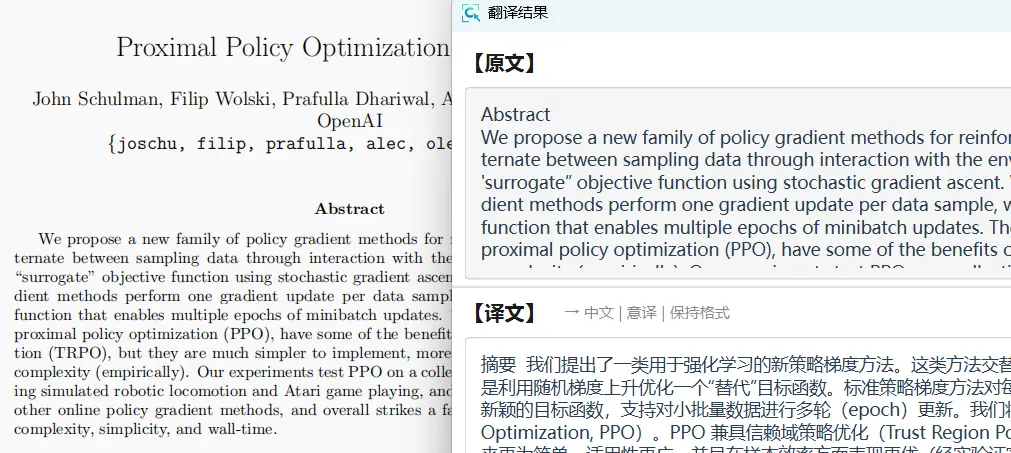
Image translation drawn back onto the picture
10 target languages and three styles: literal, idiomatic or localized.
- Text mode shows the source and the translation side by side, both directly editable
- Image mode overlays each translation on the original; every box can be dragged and resized
- Saving the image renders the translations into the file, named Translation_Screenshot…
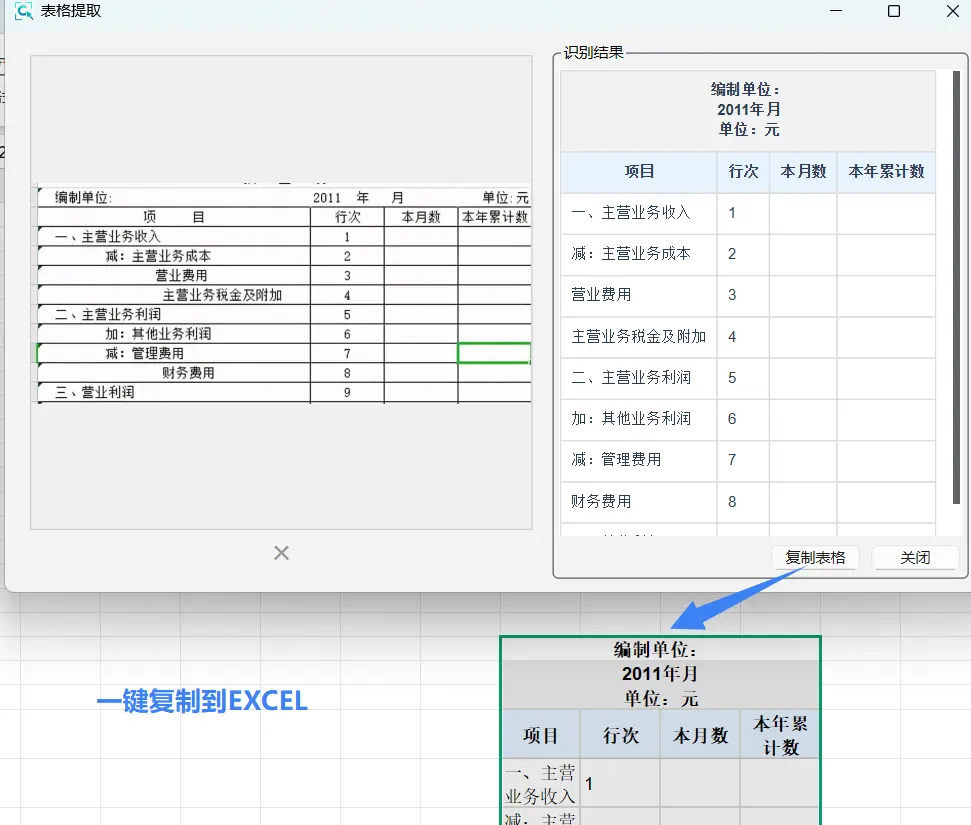
Tables straight into Excel
Press Ctrl+E, and the table lands in your clipboard.
- Both plain text and HTML clipboard formats are written, so Ctrl+V in Excel just works
- Rows, columns and merged cells are preserved — no Paste Special needed
- A failed recognition leaves your clipboard untouched and explains what went wrong
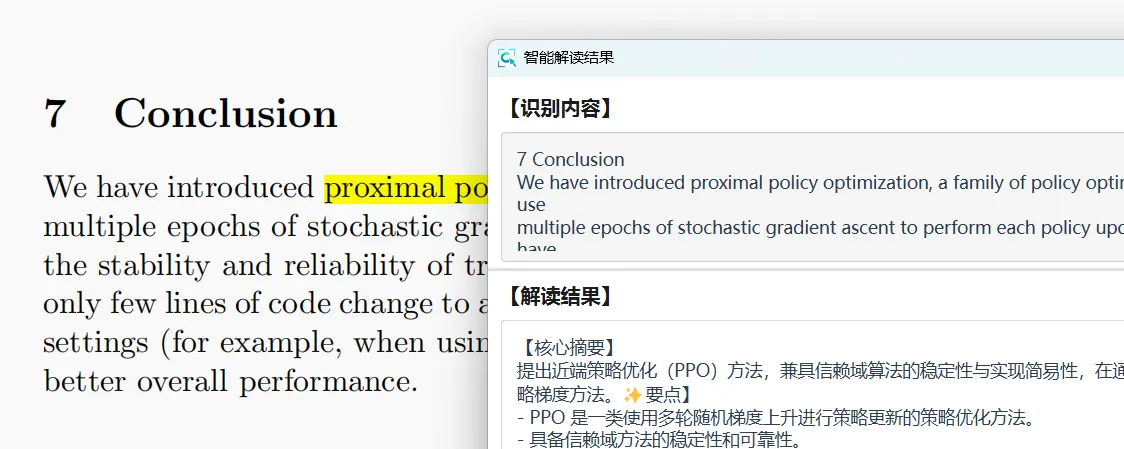
Let the AI read the screenshot for you
OCR extracts the text first, then a language model turns it into a structured reading.
- Summary, key points and suggestions — useful for long documents, contracts and papers
- Your own service comes first, then PixWit AI; when the cloud quota runs out it falls back to the recognized text
- The result window matches the translation one: both panes are editable and copyable
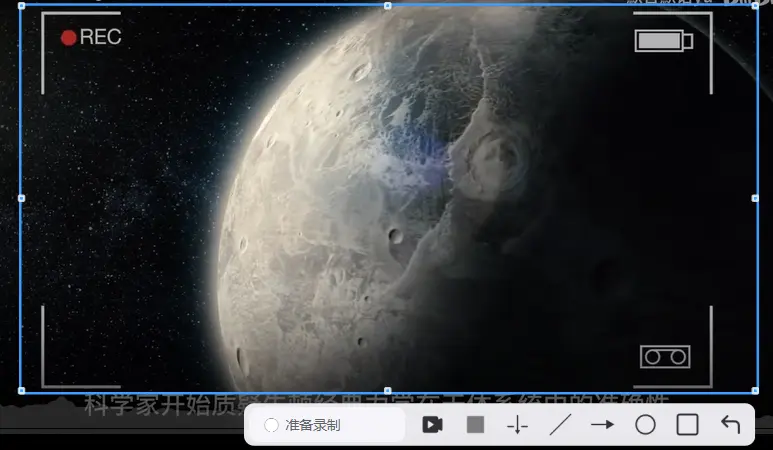
Recording with a picture-in-picture camera
Press F3 to start, F3 again to stop, F4 to pause and resume at any moment.
- A 3-second countdown starts the recording; press F3 during it to cancel
- Annotate live while recording — until you pick a tool, the cursor passes straight through
- System audio and microphone can be recorded together with separate volume, output as MP4 / MKV / GIF
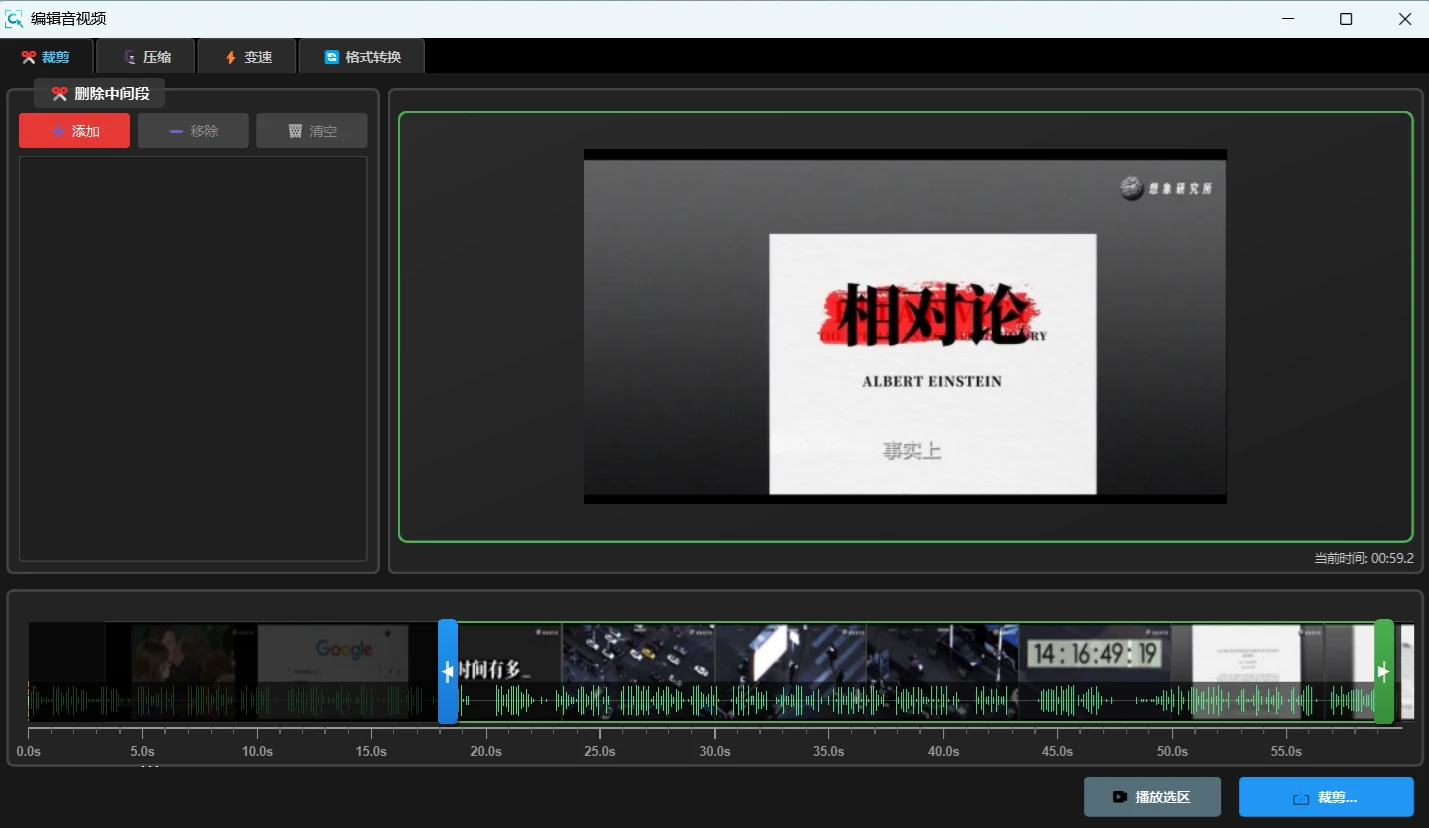
Post-production without leaving the app
Trim, compress, change speed and dub in the same window you recorded in.
- Zoom the timeline up to 1000%, cut out middle segments, and single-segment trims are lossless
- Three compression levels save up to about 70%, and 0.5x–3.0x speed changes leave frames untouched
- Also convert to GIF, dub the video, or split the audio into fixed-length files
🚀 Quick start
Three steps and you are up and running
Download and unpack
Grab the portable edition and unpack it into any folder
Run PixWit.exe
The app minimizes itself to the system tray
Start using it
F1 to capture, F3 to record — that is all there is to it
📖 First steps: the toolbar and the tray
PixWit starts as a slim toolbar pinned to the screen (60px wide, always on top) while the program keeps running in the system tray:
- The toolbar: a drag handle
⋮⋮⋮on top, then Region capture, Open image and Record screen. You can also drop an image or video file straight onto the toolbar. The × at the bottom only hides the toolbar — the app keeps running in the tray. - Auto-hide at the screen edge (on by default): drag the toolbar to an edge and it snaps there; after the cursor leaves it retracts to a thin strip, and sliding back over that strip brings it out again. Dragging it to the middle of the desktop disables the behaviour. Hidden is not the same as exited — the F1 and F3 hotkeys keep working.
- Tray menu: right-click the tray icon for every entry point — Screenshot history (browse / open folder / change save folder / clear), Settings, Show main window, Start with Windows, dark / light theme, language, Help (User Guide / Check for updates / Feedback / Open log file / Website) and Exit.
- Single instance: launching PixWit again does not start a second copy — it brings the existing toolbar up and on top.
- Start with Windows: tick the tray entry. Administrators get a scheduled task, standard accounts get a startup entry.
Full details in the User Guide and the installation guide (Chinese).
🧭 The full feature list
Everything PixWit can do, grouped the way the user guide is organised. Each line links to the detailed tutorial.
📸 Capture & annotate
- Three selection modes: free selection (default), fixed aspect ratio (
1:1/4:3/9:16/16:9) and fixed-size "stamp" mode (800×600 / 1024×768 / 1280×720 / 1920×1080 / 500×500 / custom 10–9999 px) — Screenshots - UI element detection: window-only (fast) and element-only (precise) modes; press Tab to cycle and scroll to step through overlapping windows and controls, and the level you picked sticks — Screenshots
- Annotation tools: arrow (optionally with a caption), pen, rectangle, ellipse, line, polyline, text, numbering and mosaic, with stroke/fill, solid/dashed, opacity and spotlight — Screenshots
- Behaviour switches: mask opacity, full-screen capture, cross-monitor capture, double-click to copy and close, auto-finish after dragging, show on-screen hints — Screenshots
- Scrolling screenshot: automatic stitching every 0.5 s or manual scrolling, pauses when the cursor leaves the region, and the result becomes a sticky note — Scrolling screenshot (Chinese)
📌 Sticky notes, history and personalisation
- Sticky notes: borderless, always on top, 10%–500% zoom,
Ctrl+wheelfor opacity, double-click to copy and close, plus crop, rotate and mirror — Sticky notes (Chinese) - Clipboard sticky:
Ctrl+Shift+Vpastes the clipboard image under the cursor, and pressing it again walks back through the clipboard history; plain text is rendered as a note card first — Sticky notes (Chinese) - History: grouped by today / yesterday / this week / earlier, starrable and filterable, searchable by the text inside a screenshot (requires the OCR index), with a configurable folder and retention policy — History (Chinese)
- Color picker: an 8x magnifier follows the cursor and copies the color as
RGB/#HEX/HEX— Color picker - Watermark: text, size, color, font, position (including a 45° tiled pattern), margin and date-time, previewed live and burned into the output — Watermark
- Personalisation: 8 interface languages, dark and light themes, custom tray icon and tray click behaviour — Settings
🎥 Screen recording
- Region and full-screen recording: a 3-second countdown, pause and resume at any time, and paused time is not counted — Screen recording
- Live annotation: until you pick a tool the cursor passes straight through, then
Alt+I/Alt+J/Alt+O/Alt+Kdraw lines, arrows, ellipses and rectangles — Screen recording - Camera picture-in-picture (full-screen only): the camera feed sits in the bottom-right corner and can be dragged wherever you want it in the final video — Screen recording
- Audio: silent / system audio / microphone / both, with independent volume for each channel when recording both — Screen recording
- Output and quality: MP4 / MKV / GIF, three quality presets, 1–120 fps and hardware encoding; long recordings are split into 10-minute segments automatically — Screen recording
🤖 AI capabilities
- OCR: local models (built-in tiny, downloadable small) and cloud services can be combined; the result is copied automatically and clicking any line copies just that line — Text recognition
- Image translation: 10 target languages and literal / idiomatic / localized styles; image mode overlays the translation on the original and saves them together — Image translation
- Table extraction: the result goes to the clipboard in plain text and HTML, so pasting into Excel keeps rows, columns and merged cells — Table extraction
- LaTeX formulas:
Ctrl+Mextracts formula source with a multimodal model, one formula per line — Text recognition - AI insights: OCR first, then a language model writes a summary, key points and suggestions — AI insights (Chinese)
- AI chat: multi-turn questions with the screenshot attached, switchable models and up to 20 prompt templates — AI chat (Chinese)
- QR codes and barcodes: recognized instantly and the first result is copied to the clipboard — Text recognition
- Selectable providers: local OCR only (offline), PixWit AI (works out of the box) or your own AI service and Baidu OCR, routed by a fixed priority — Settings
🖼️ Images and video
- Image viewer: 10%–1000% zoom, fit-to-window or actual size, full screen, previous and next — Images (Chinese)
- Crop: rectangle or ellipse, free or
1:1, plus ID-photo presets (1-inch, 2-inch, small 1-inch, ID card, passport) — Images (Chinese) - Perspective correction: click the four corners to straighten a skewed document or whiteboard — Images (Chinese)
- Resize and quality: 1–10000 px, 0.01–10x scaling and JPEG quality compression — Images (Chinese)
- Save, convert and print: PNG / JPEG / BMP / GIF / WebP / PDF / ICO conversion, and print with automatic paper orientation — Images (Chinese)
- Video editor: trim (including deleting middle segments), compress, change speed, convert formats, dub and split audio — six tabs — Video
- GIF editor: crop, change speed and resize, plus frame-by-frame editing, drag-to-reorder and duplicate-frame detection — Video
⚙️ Settings and hotkeys
- Seven settings pages: General / Screenshot / Annotation / Recording / Hotkey / Saving / AI Service Config — Settings
- 16 global hotkeys, all remappable or disableable, with a tray warning when a combination is taken — Shortcuts
- Saving: default format, image quality, file name prefix and separator, date format and the screenshot retention policy — Saving
- Updates and feedback: automatic update checks, both GitHub and Gitee download sources, and three ways to deal with a download blocked by Windows or an antivirus — Updates and feedback (Chinese)
Want the per-module walkthrough with every default value? See the feature overview (Chinese). For hands-on efficiency tips see tips and tricks (Chinese), and the FAQ answers the most common questions.
💡 Why PixWit?
No sign-up, every feature unlocked, ready the moment it is installed — cloud AI when you need it, local capability when you do not
No sign-up, no ads, no in-app purchases
Open it and use it. No account to create, every feature available, and no pop-up ads interrupting your work.
OCR that works offline
A tiny model ships with the app; download the small model for higher accuracy and text recognition still works with no network.
9 interface languages
Chinese, English, Japanese, Korean, French, Spanish, Russian, Portuguese and Vietnamese, plus dark and light themes.
Every hotkey is remappable
All 16 global hotkeys can be changed or disabled with one click; the tray tells you when another app already owns a combination.
Screenshots kept for you
History is grouped by day and week, can be starred and searched by the text inside, and both the folder and the retention policy are yours to set.
One tool for the whole flow
From capture and annotation to stickies, recording, OCR, translation, tables, formulas and video post-production — no switching apps.
❓ Quick answers
The questions new users ask most — expand any of them to see the answer
Pressing F1 does not take a screenshot?
Open Settings → Hotkey Settings and make sure the hotkey has not been cleared. If the tray has ever shown a "hotkey conflict" toast, another program already owns that combination — pick a different one.
Also note: pressing the capture hotkey again while the region is on screen cancels it, and pressing it while the editor is open turns the current image into a sticky note. Neither one is a failure.
The hotkey does nothing inside a game?
When PixWit detects exclusive fullscreen (real fullscreen, not borderless windowed), it falls back to capturing the whole screen and tells you in the tray. To use region capture in a game, switch the game to borderless windowed mode.
If every hotkey stops working inside the game and recovers the moment you switch to the desktop, the game is swallowing system hotkeys through Raw Input — a Windows behaviour. Use borderless windowed mode or the game's own screenshot feature.
The main toolbar disappeared?
It may have auto-hidden at the screen edge — move the cursor to the thin edge strip and it slides back out. Or it was hidden with the × button. Right-click the tray icon and check "Show main window"; hidden is not the same as exited.
Pasting a table into Excel looks wrong?
The table is already in your clipboard when recognition finishes (plain text and HTML), so just press Ctrl+V in Excel — do not use Paste Special.
No "ready to paste" text appears on screen; on success you only see a "✓ Table copied to clipboard" toast. To copy again, right-click in the result window and choose Copy all.
The recording has no sound, or the file is huge?
No sound: check Settings → Recording settings → Record audio and make sure it is not set to Silent. With system audio plus microphone you can balance both channels under Volume control.
Huge file: lower the video quality preset or the frame rate, or record first and then compress in the video editor — the three presets save up to about 70%.
Does it run on Windows 7?
No. PixWit supports Windows 10 and 11 only (1809 or later recommended on Windows 10).
📥 Ready to get started?
Windows 10 / 11 · No sign-up · No ads · Every feature unlocked