
🎞️ Video Processing
PixWit's video capabilities are split across two windows: Edit Audio/Video handles trimming, compression, speed adjustment, format conversion, dubbing, and audio splitting for videos and audio; opening a .gif / .apng file enters the Edit GIF Animation window, which handles animation trimming, speed adjustment, resizing, and frame editing.
Opening a Video
Supported Formats
| Type | Formats |
|---|---|
| Video | mp4, avi, mov, mkv, flv, wmv, webm, m4v |
| Audio | mp3, wav, flac, aac, ogg, m4a, wma |
Audio files can also be opened for processing, for example splitting them into segments with 🔪 Audio Split, or converting them to another audio format with 🔄 Convert.
Three Ways to Open
- Open from the main window: Click the Open Image button on the main window (the tooltip says "Open Image/Video"), then select a video or audio file in the file dialog.
- Drag and drop: Drag a video file directly onto the main window to open it.
- Edit after recording: Once a screen recording has been saved, click ✂️ Edit in the Recording Complete dialog that appears (the dialog also has ▶️ Open / 📂 Open Folder). Videos open the Edit Audio/Video window, and GIFs open the Edit GIF Animation window. For details on the recording flow, see Screen Recording.
Window Layout
Once opened, the Edit Audio/Video window contains 6 tabs:
| Tab | Purpose |
|---|---|
| ✂️ Trim | Trim the start and end, delete middle segments |
| 🗜️ Compress | Reduce file size; change resolution and output format |
| ⚡ Speed | 0.5x to 3.0x playback speed |
| 🔄 Convert | Convert to other video / audio formats, including GIF |
| 🎙️ Dubbing | Record while the video plays and merge the new recording with the original video |
| 🔪 Audio Split | Split audio into multiple files by segment duration |
Behavior when closing the window
- After export completes, the window does not close automatically; you can continue working on the same file in other tabs.
- Closing the window exits it; there is no separate "Cancel" button in the interface.
- No unsaved-changes prompt appears when closing; adjustments that were not exported are not kept.
✂️ Trim
Timeline Controls
| Action | Effect |
|---|---|
| Ctrl + mouse wheel | Zoom the timeline, from 10% to 1000% |
| Mouse wheel (when zoomed in) | Scroll horizontally |
| Drag the left or right handle | Adjust the start or end point (the handle can be grabbed within 16px on either side of its center) |
| Drag inside the selection | Move the whole selection |
| Double-click inside the selection | Play from that point to the end of the selection |
The selection must be at least 0.5 seconds long.
Keyboard Fine-Tuning (Two Sets)
Keyboard fine-tuning comes in two sets; which set is active depends on whether the timeline has focus (if you have clicked the timeline, the first set is active):
| When the timeline has focus | Function |
|---|---|
| ← / → | Start point ∓0.1 seconds (Shift for 1 second) |
| ↑ / ↓ | End point ±0.1 seconds (Shift for 1 second) |
| Ctrl + arrow keys | Move the whole selection |
| , / . | Move the preview position by 0.1 seconds (without changing the selection) |
| Ctrl + mouse wheel | Zoom the timeline |
| When the timeline does not have focus | Function |
|---|---|
| ← / → | Start point ∓0.1 seconds (Ctrl for 0.5 seconds) |
| ↑ / ↓ | End point ±0.1 seconds (Ctrl for 0.5 seconds) |
| Ctrl+Enter | Perform the trim |
| Esc | Exit full screen if in full screen; otherwise close the window |
Mnemonic
When the timeline has focus, use Shift to move by 1 second; outside the timeline, use Ctrl to move by 0.5 seconds. To export directly from anywhere, press Ctrl+Enter.
Preview and Validation
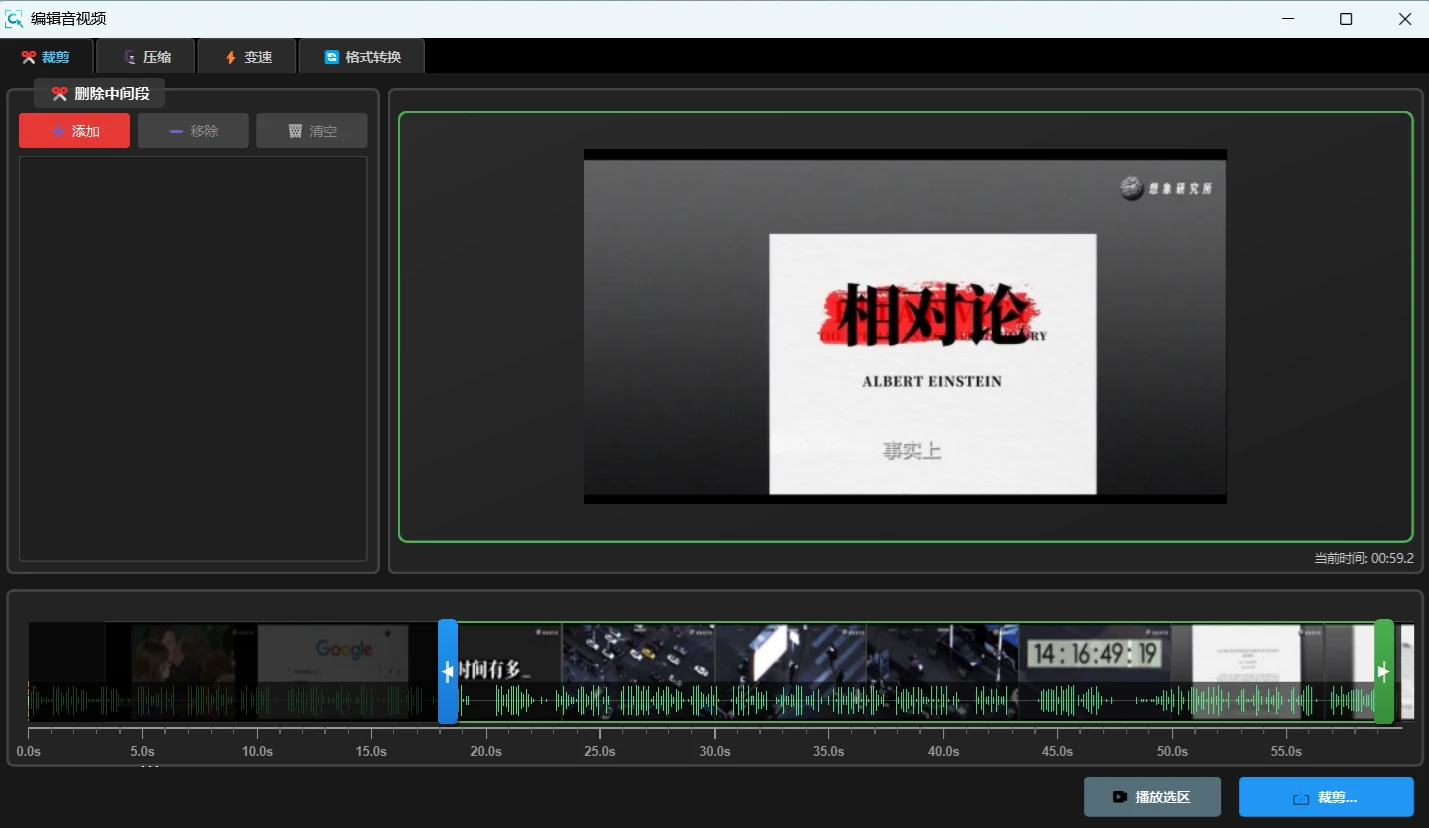
- Click Play Selection to preview the selected content; during playback the button changes to Stop Playing.
- If the selection is shorter than 0.5 seconds, the app shows "Selected range too short, at least 0.5 seconds required".
Deleting Middle Segments
Use the ✂️ Delete Middle Segment group to manage the ranges you want to remove:
| Button | Action |
|---|---|
| ➕ Add | Add the current selection to the deletion list |
| ➖ Remove | Remove the selected item from the deletion list |
| 🗑️ Clear All | Clear the entire deletion list |
When adding, the app validates that: start must be less than end, each segment must be at least 0.1 seconds, and ranges cannot overlap.
📷 Image placeholder (Figure 1)
Video trim timeline — shows the left and right handles, the selection, the delete-middle-segments list, and the export button at the bottom reading Trim... To add the image: place the file at docs/public/images/video-trim-timeline.webp, then delete this tip block and uncomment the next line.
Exporting the Trim
- The export button at the bottom actually reads
Trim.... - Single-segment trim uses lossless copy (no re-encoding, so it is fast).
- Multi-segment trim (deleting middle segments) extracts the segments first and then merges them, showing "Extracting segment N/M..." and "Merging segments..." along the way.
- When finished, the app shows "✅ Trim Saved".
Default file names:
| Scenario | Default file name |
|---|---|
| Single-segment trim | <original name>_trim_<start>-<end>_<timestamp>.<extension> |
| Multi-segment trim | <original name>_multiCut_<timestamp>.<extension> |
🗜️ Compress
| Setting | Options |
|---|---|
| Compression Quality | High Quality (CRF 23, ~30% compression) / Balanced Quality (CRF 28, ~50% compression) (default) / High Compression (CRF 32, ~70% compression) |
| Output Resolution | Keep Original Resolution (default) / 480p / 720p / 1080p / 4K |
| Output Format | MP4 (Recommended) (default) / AVI / MOV / MKV |
Steps:
- Open a video and switch to the 🗜️ Compress tab.
- Choose the compression quality, output resolution, and output format.
- Click Export Compressed Video; the progress dialog shows the percentage and the processed duration / total duration.
- When finished, it shows the original size, compressed size, and compression ratio.
Default file name: <original name>_compressed_<original video timestamp>.<format>.
Video compression has only one entry point
Compression is available only through Edit Audio/Video → 🗜️ Compress; there is no separate menu item or keyboard shortcut.
📷 Image placeholder (Figure 2)
Video compression page — shows the three compression quality levels, output resolution, output format, and the Export Compressed Video button To add the image: place the file at docs/public/images/video-compress.webp, then delete this tip block and uncomment the next line.
⚡ Speed
| Playback Speed | Description |
|---|---|
| 0.5x Speed | Slow |
| 0.75x Speed | Slightly slow |
| 1.0x Speed | Normal (default) |
| 1.5x Speed | Slightly fast |
| 2.0x Speed | Fast |
| 3.0x Speed | Ultra-fast |
The app shows the tip "Speed is adjusted by changing the frame interval; the frame content is not modified". We recommend clicking Preview to check the result first, then Apply Speed to export.
🔄 Convert
Choose the target format, then click Export Converted File.
When converting to GIF, an extra 🎨 GIF Settings section appears:
| Setting | Options |
|---|---|
| Frame Rate | 10 FPS (Small File) / 15 FPS (Recommended) (default) / 20 FPS (Smooth) / 30 FPS (High Quality) |
| Size | Original Size / 720p / 480p (default) / 360p |
On-screen tip text:
💡 Tip: GIF files are large, consider lowering the frame rate and resolution. Recommended for short videos (<10s).
Audio formats (MP3 / WAV / FLAC / AAC / OGG) are converted here as well: open an audio file and switch to the 🔄 Convert tab.
Video to GIF or GIF animation editing?
Here, Convert → GIF means converting a video into a GIF; opening an existing .gif / .apng file enters a different window — "Editing GIF Animations" — and the two are not the same feature.
📷 Image placeholder (Figure 3)
GIF settings under Convert — shows the target format selection, the frame rate and size dropdowns in 🎨 GIF Settings, and the file-size tip line To add the image: place the file at docs/public/images/video-gif-settings.webp, then delete this tip block and uncomment the next line.
🎙️ Dubbing
- ⚙️ Dubbing Settings contains four groups: 🎤 Recording Device, 🔊 Monitor, ⚙️ Mode, and 📊 Volume (the original audio and the recording can be adjusted separately).
- When Mute playback during dubbing (prevent echo) is checked, the video plays muted during dubbing, so the microphone does not also pick up sound from the speakers.
- Click Start Dubbing to record while the video plays; when finished, it is saved as a dubbed video, and the app merges the new recording with the original video.
- Examples of failure messages: No microphone device detected / Microphone device unavailable / Please select a microphone device / FFmpeg not found.
🔪 Audio Split
- ✂️ Split Settings contains Segment Duration and Output Format (Keep Original Format (default) / 🎵 MP3 / 🎼 WAV / 🎧 FLAC / 🔊 AAC / 🎶 OGG).
- Click Start Splitting to split the audio into multiple files at the set duration.
- Progress message: "Splitting audio... Will generate N files"; completion message: "🎉 Audio splitting complete!".
- Invalid parameters produce: "Split duration must be greater than 0 seconds!" or "Cannot get audio duration, please check if file is valid!".
Editing GIF Animations
This is not the same feature as Convert → GIF: that converts a video into a GIF, while here you edit an existing
.gif/.apngfile.
Opening a .gif / .apng file enters the Edit GIF Animation window, which has 4 tabs: Crop / Speed / Resize / Frame Editing.
Crop / Speed / Resize: These three pages are similar to the video pages, and each has Preview plus a corresponding apply button (Apply Crop, Apply Speed, Apply Size).
Frame Editing page:
- The frame list shows thumbnails with
#frame number delay ms; - The info bar shows "N frames total (M selected) | Total duration: ...";
- Supports click to select, Ctrl multi-select, and Shift range select;
Deletedeletes the selected frames;- Drag thumbnails to reorder frames;
- Detect Duplicates: finds adjacent duplicate frames, with an adjustable threshold; after confirmation, deletes them in a batch.
- The frame list shows thumbnails with
Original tip line on the Frame Editing page:
Tip: Click a frame to select it (Ctrl for multi-select, Shift for range select) | Delete to remove | click "Apply Frame Edits" to save
Output and closing
- Only
.gifcan be output. - Clicking Apply Crop, Apply Speed, Apply Size, or Apply Frame Edits on each page saves and closes the window.
- Closing the window discards unapplied changes.
📷 Image placeholder (Figure 4)
GIF Frame Editing page — shows the frame thumbnail list, #frame number delay ms, Ctrl multi-select and Shift range select, and duplicate detection To add the image: place the file at docs/public/images/video-gif-frame-edit.webp, then delete this tip block and uncomment the next line.
Shortcut Summary
Video trimming has two keyboard sets, and which set is active depends on whether the timeline has focus. See "Keyboard Fine-Tuning (Two Sets)" above for the complete comparison:
- Timeline has focus: ← / → start point ∓0.1 seconds, ↑ / ↓ end point ±0.1 seconds (Shift for 1 second each); Ctrl + arrow keys moves the whole selection; , / . move the preview position by 0.1 seconds; Ctrl + mouse wheel zooms the timeline.
- Timeline does not have focus: ← / → start point ∓0.1 seconds, ↑ / ↓ end point ±0.1 seconds (Ctrl for 0.5 seconds each); Ctrl+Enter performs the trim; Esc exits full screen if in full screen, otherwise closes the window.
GIF editing window:
| Shortcut | Function |
|---|---|
| Delete | Delete selected frames |
| Ctrl+A | Select all frames on the Frame Editing page |
Related Reading
- Screen Recording — the Recording Complete dialog and the ✂️ Edit entry after recording
- Keyboard Shortcuts — the complete key reference for video trimming and GIF editing
- Image Viewing and Editing (Chinese) — image cropping, format conversion, and printing (all image processing unrelated to video is covered here)