
📊 Extract Table
AI-powered table recognition that turns a table in your screenshot into editable content. When recognition finishes the result goes straight to the clipboard, ready to paste into Excel.
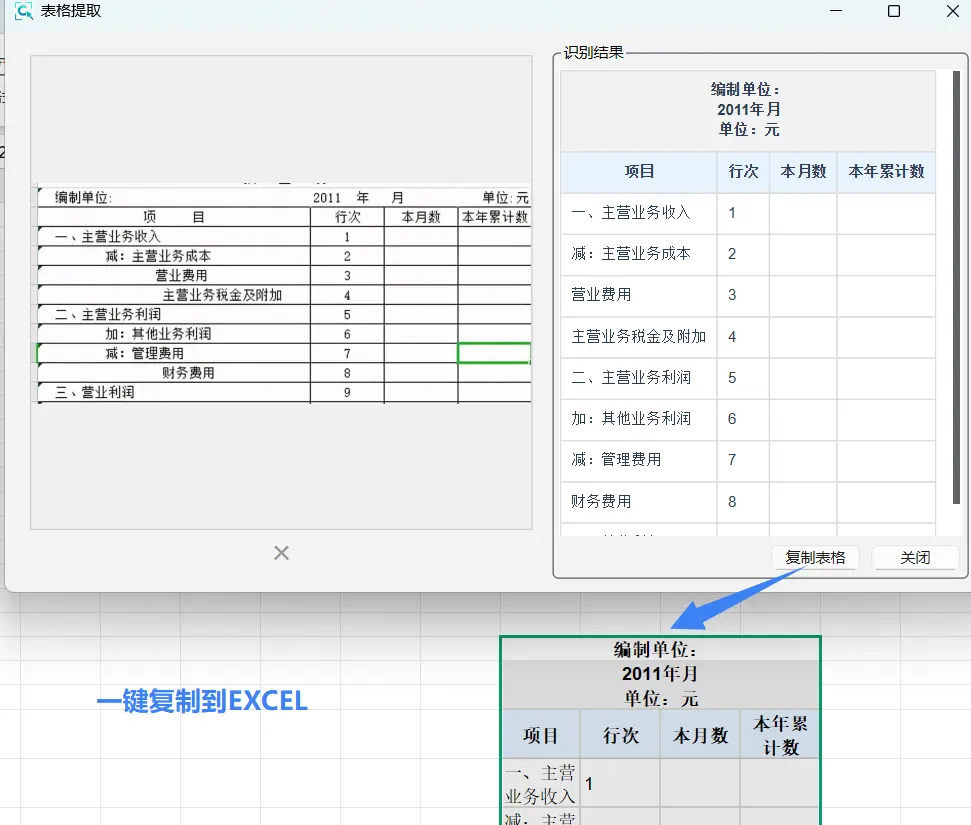
Entry Points and Triggers
| Entry point | Description |
|---|---|
| Hotkey Ctrl+E | Can be changed in Settings → Hotkey Settings → 🤖 AI Feature Hotkeys → 📊 Extract Table; clear it to disable the feature |
| Toolbar "Extract Table" | This button is hidden by default; add it to the toolbar in Settings → Annotation Settings → Toolbar buttons, or put it in the AI dropdown menu and call it from there |
What happens when it is triggered (this is shared with OCR, Translation, AI analysis and the other AI features):
- An edit window is already open: the table is extracted from the image currently shown there.
- No edit window: the region capture overlay opens first, and extraction runs immediately after you finish selecting the region instead of opening the edit window. So Ctrl+E on its own is the "capture → extract table" shortcut.
- If another annotation tool is selected in the region, the AI action will not run.
📷 Illustration placeholder (Figure 1)
Adding "Extract Table" in the toolbar button settings — show the two columns of Settings → Annotation Settings → Toolbar buttons, and the operation of moving "Extract Table" from "Hidden buttons" to the toolbar Image to add: put the image at docs/public/images/table-add-button.webp, then delete this tip block and uncomment the next line
Prerequisites and Service Routing
PixWit AI must be enabled, or "Custom AI Service" must be enabled with Baidu Table Recognition configured; otherwise you will see "Table recognition service not configured or not enabled".
| Situation | Service actually used |
|---|---|
| "Custom AI Service" checked and Baidu Table Recognition configured | Baidu Table Recognition takes priority |
| Any other case | PixWit AI |
| Only "Local OCR only" checked | ❌ Does not take part in table recognition |
"Local OCR only" does not take part in table recognition
Local OCR only is used for text recognition only; table extraction never goes through local OCR. To use it, PixWit AI or Baidu Table Recognition has to be available.
How to Use
- Press F1 to capture an image that contains a table (you can also open an image or an edit window first and then press Ctrl+E).
- Once triggered, an "Extracting table..." progress overlay appears in place on screen; press Esc or click the overlay to cancel.
- When recognition finishes, the table result window opens and the table has already been written to the clipboard automatically (the same as OCR and LaTeX formulas — no need to right-click first) — switch to Excel and press
Ctrl+Vto paste the table. - While the result window is open, the screenshot edit window closes automatically.
- If recognition fails (😕 Table recognition failed / service not configured / quota used up), the clipboard is not touched and whatever you had copied before stays as it was.
Table Result Window
The result window has no button bar
The table result window has no button bar — every action is performed by right-clicking inside the window and choosing from the context menu.
The table has already been copied once after successful recognition
As soon as the result arrives, the whole table is written to the clipboard automatically (both plain text and HTML, exactly the same data as the right-click "📄 Copy All Content"), and only a ✓ Table copied to clipboard toast floats up in the window. The context menu is left for operations such as "copy again", "copy just the selected part" and "save image".
| Menu item | Description |
|---|---|
| 📄 Copy All Content | Copy the whole table |
| 📋 Copy Selected Content | Copy the selected part (only appears when something is selected in the table area) |
| 💾 Save Image | Save the original image |
| ✕ Hide Image | Collapse the image pane so the table gets more width |
| 📷 Show Image | Appears once the image is hidden; restores the image pane |
| ↺ Restore Default View (Image + Table) | Restore the default layout |
| 📌 Keep Window on Top | Toggle always-on-top |
📷 Illustration placeholder (Figure 2)
Table result window context menu — show the menu that pops up when you right-click in the result window: 📄 Copy All Content, 📋 Copy Selected Content, 💾 Save Image, ✕ Hide Image, ↺ Restore Default View, 📌 Keep Window on Top Image to add: put the image at docs/public/images/table-result-menu.webp, then delete this tip block and uncomment the next line
Pasting into Excel
- Once recognition finishes the program has already copied the table for you (it writes both plain text and HTML to the clipboard); to copy it again, right-click in the result window → 📄 Copy All Content.
- Switch to Excel and press Ctrl+V — rows, columns and merged cells are all preserved.
Use a normal paste, not "Paste Special"
Paste with a plain Ctrl+V in Excel and do not use "Paste Special" — that drops the HTML format and leaves only plain text.
- After a successful copy the only feedback is the floating
✓ Table copied to clipboardtoast (a manual copy shows✓ Copied); no text such as "ready to paste into Excel" appears in the UI, so not seeing a toast does not mean the copy failed. - The automatic copy covers the whole table; if you only want part of it, select that content in the table area first and then use "📋 Copy Selected Content".
📷 Illustration placeholder (Figure 3)
Pasting a copied table into Excel — show the ✓ Table copied to clipboard toast that floats up automatically once recognition finishes, and the result of pressing Ctrl+V in Excel with rows, columns and merged cells preserved Image to add: put the image at docs/public/images/table-excel-paste.webp, then delete this tip block and uncomment the next line
Service Configuration
Entry: tray icon right-click → Settings... → left navigation 🤖 AI Service Config (not the "AI Service Config" item in the tray menu).
- AI Service Source: check Pixwit AI, or check Custom AI Service (use your own API Key) — the three checkboxes can be combined, and the priority is fixed at Local > Custom > Pixwit.
- Baidu OCR / Baidu Table Recognition (shown once "Custom AI Service" is checked): check
Enable Baidu Table Recognition Serviceand fill in the four inputsAPI Key,Secret Key,Token URLandTable Recognition URL(leave a URL empty to use Baidu's official default), then click Test Connection to verify. - A successful test reports a successful connection along with the key settings; missing required fields, timeouts, abnormal HTTP status codes and network errors each produce their own message.
- Credentials are stored in the program's
ai_credentials.json.
Recognition Failures
When recognition fails, the window shows 😕 "Table recognition failed" plus a friendly explanation, for example:
| Message | Description |
|---|---|
| Authentication failed, please check API Key, Secret Key or Token URL configuration | The credentials or addresses for Baidu Table Recognition need to be checked |
| Network connection failed, please check network or URL configuration | The network is down, or Table Recognition URL cannot be reached |
| No table content recognized, please ensure the image contains a clear table | There is no recognizable table content in the image |
Improving Recognition Accuracy
- Capture a clear, straight, unobstructed high-resolution image and avoid skew or distortion.
- Keep the table borders complete, the background plain and the text legible.
- Capture one table at a time; for several tables, capture them separately to avoid confusion.
- If recognition fails, the program tries other engines; if that still fails, select a smaller region and try again.
FAQ
Q: The table pastes into Excel even before I right-click anything?
- That is expected: once table recognition finishes the table is copied once automatically (the same as OCR and LaTeX formulas), so you do not need to click "📄 Copy All Content" first. It overwrites whatever was on the clipboard; if the clipboard happens to be locked by another program (which does happen occasionally) the automatic copy may fail, and the window then shows
Copy Failed— right-click "📄 Copy All Content" to copy once more.
Q: When recognition fails, is the error text written to the clipboard?
- No. The error page (😕 Table recognition failed / service not configured / quota used up) never touches the clipboard, so whatever you had copied stays as it was.
Q: The table is formatted wrong after pasting into Excel?
- When recognition finishes the clipboard already holds both plain text and HTML (the automatic copy and the right-click "📄 Copy All Content" write the same data), so a plain
Ctrl+Vin Excel is enough — do not use "Paste Special"; to start over, right-click "📄 Copy All Content" and paste again.
Q: I get "Table recognition service not configured or not enabled"?
- Go to Settings → 🤖 AI Service Config and enable Pixwit AI, or check "Custom AI Service" and configure Baidu Table Recognition (remember to click Test Connection to verify).
Q: Only plain text is pasted, without rows, columns or merged cells?
- That means the HTML format was not written along with it: make sure you used a normal paste rather than "Paste Special", and right-click "📄 Copy All Content" to copy once more first (the automatic copy writes the same data).
Related Tutorials
- OCR Text Recognition
- Image Translation
- AI Analysis (Chinese)
- AI Dialog (Chinese)